StaffingLeads email settings explained: daily limits, sending hours, signature, sign-off, PS line and test emails

What every email setting does when you connect your own Gmail or Outlook to StaffingLeads: the defaults, what you can change, how the signature, PS line and AI sign-off work, and how to send yourself a test before anything goes to a lead.
When you connect your own Gmail, Outlook or other mailbox to StaffingLeads, your agents send their emails from it. This guide walks through every email setting you control: how many emails go out a day, when they go out, your signature, the PS line and the sign-off on AI-written emails. It also covers how to send yourself a test so you see exactly what a prospect will get. Each section says what the default is and what you can change.
TL;DR: the defaults
| Setting | Default | You can change it to |
|---|---|---|
| Emails per day | 50 | Anything from 1 to 500 (we suggest 30 for cold email) |
| Sending hours | 8am to 6pm Eastern | Any start and end hour |
| Days | Monday to Friday | Any days of the week |
| Signature on campaign emails | Off | First email only, or every email |
| Signature on Inbox replies | Off | Short text or full signature (changeable before each reply) |
| PS line on campaign emails | On | Off |
| Sign-off on AI-written emails | "Thanks," + your first name | Best, Regards, Cheers, Thank you, Best regards, or your own words (set on each email step) |
Everything except the sign-off lives in one place: Account Settings → Sender Accounts → Settings & Limits, under your connected mailbox. There are three tabs: Sending, Signature and Preview. The sign-off is set on each AI email step in your agent's Campaign tab (Step 5 below).
Step 1: Connect your mailbox
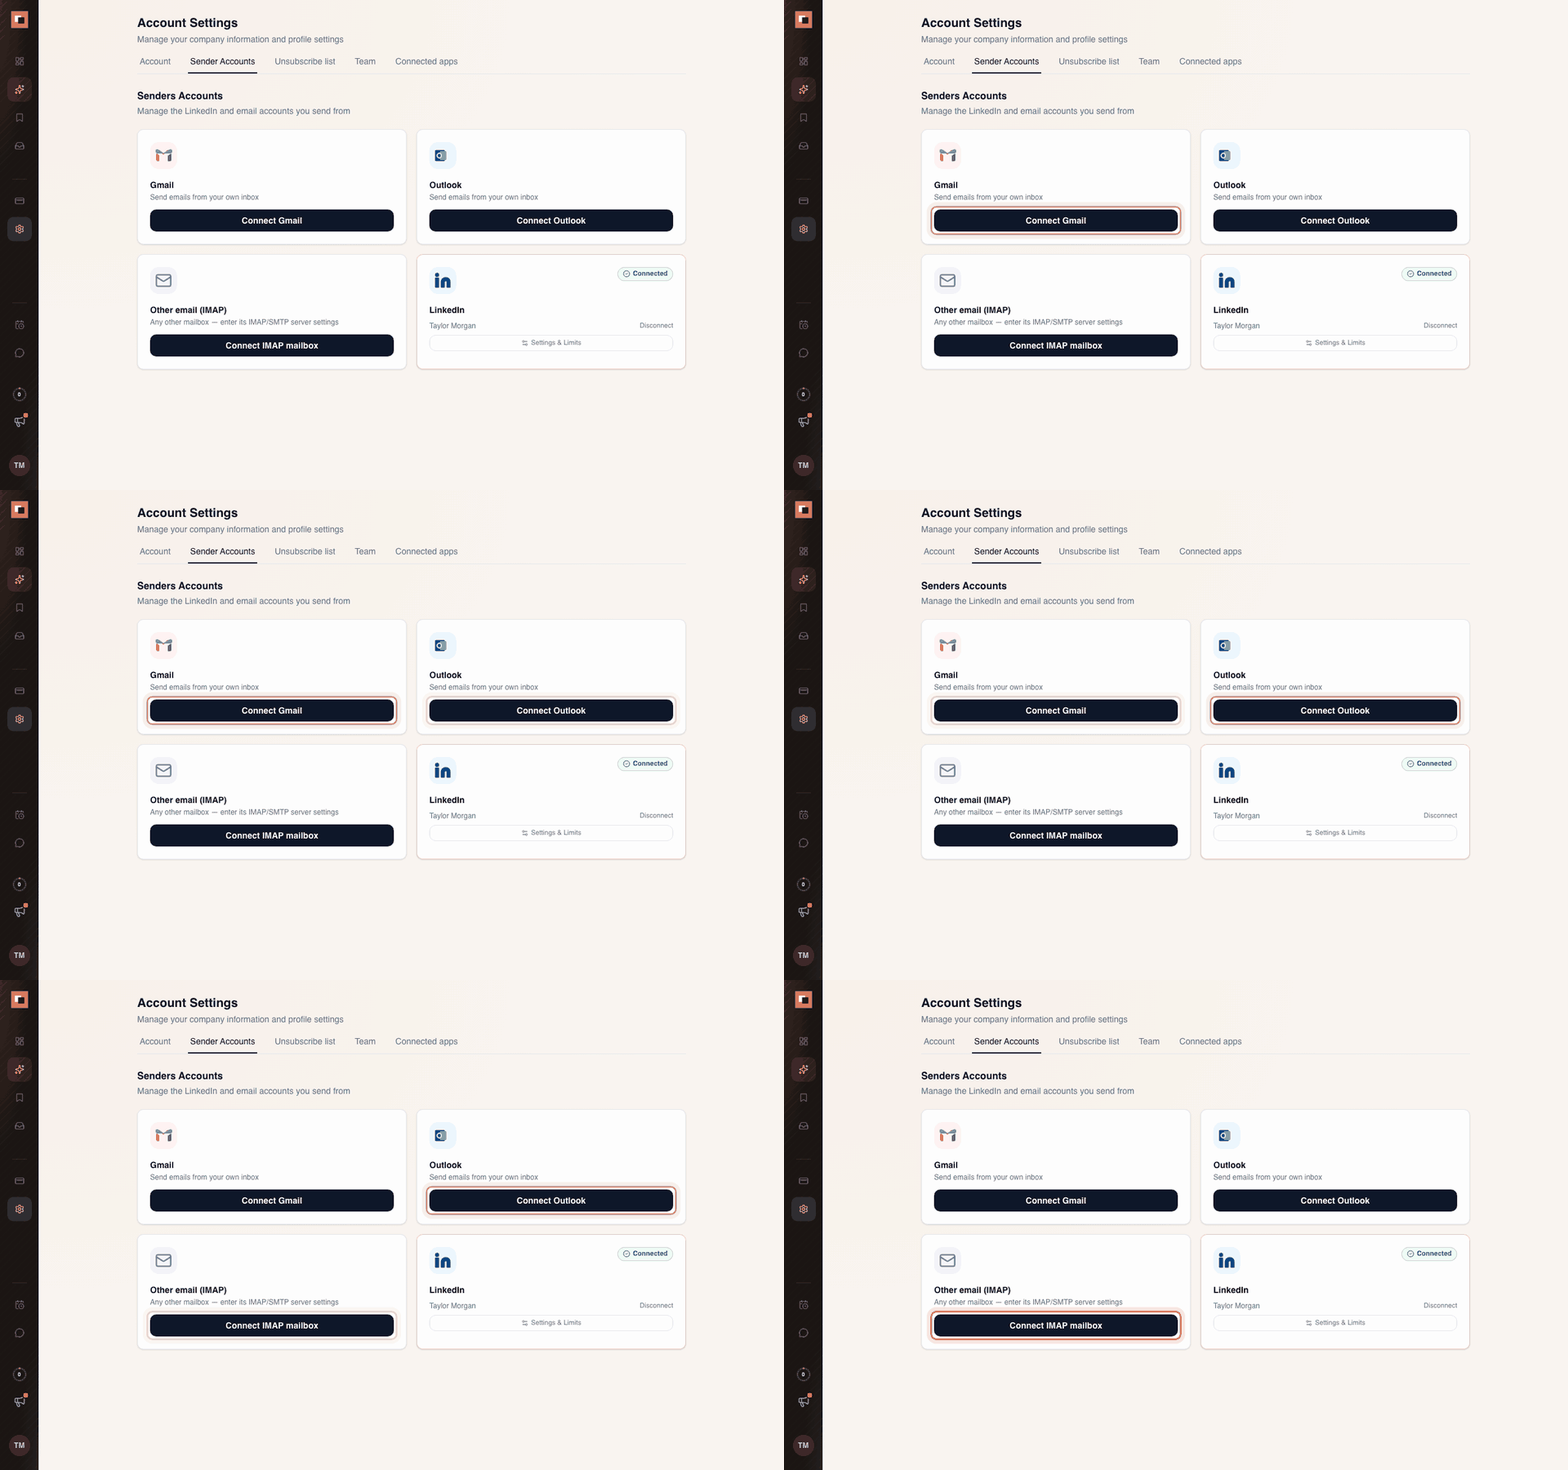
Go to Account Settings → Sender Accounts. You'll see three ways to connect email:
- Gmail: for Gmail and Google Workspace addresses.
- Outlook: for Outlook and Microsoft 365 addresses.
- Other email (IMAP): for any other mailbox, such as one hosted by GoDaddy, Zoho or your web host. You'll enter the mailbox's IMAP and SMTP server settings, which your email provider can give you.
You connect one mailbox here. Once it's connected, a Settings & Limits button appears under it.
If your mailbox ever signs out (for example after a password change), the card shows Disconnected and outreach from it pauses. Click Reconnect. Your settings are kept.
Step 2: Sending (how many, and when)
Click Settings & Limits. The first tab, Sending, has three rows.
Emails per day. The most emails this mailbox sends in one day, across all your agents. The default is 50, and you can set anything from 1 to 500.
- For cold outreach from your main company mailbox, we suggest 30 a day. Sending far more cold email than that from one mailbox is how a domain ends up in spam.
- Need more volume? Add sending accounts on separate domains instead of raising this number. See our guide to domains, email accounts and warm-up.
Sending hours. The hours emails go out, in Eastern time (ET). The default is 8am to 6pm. Emails are spread evenly across these hours, not sent in one burst, which looks like a person rather than a bulk tool. Pick hours when your prospects are at their desks.
Days. Tap the round M–S buttons to choose which days this mailbox sends. The default is Monday to Friday. Weekend cold email to hiring managers rarely helps, so most recruiters leave it that way.
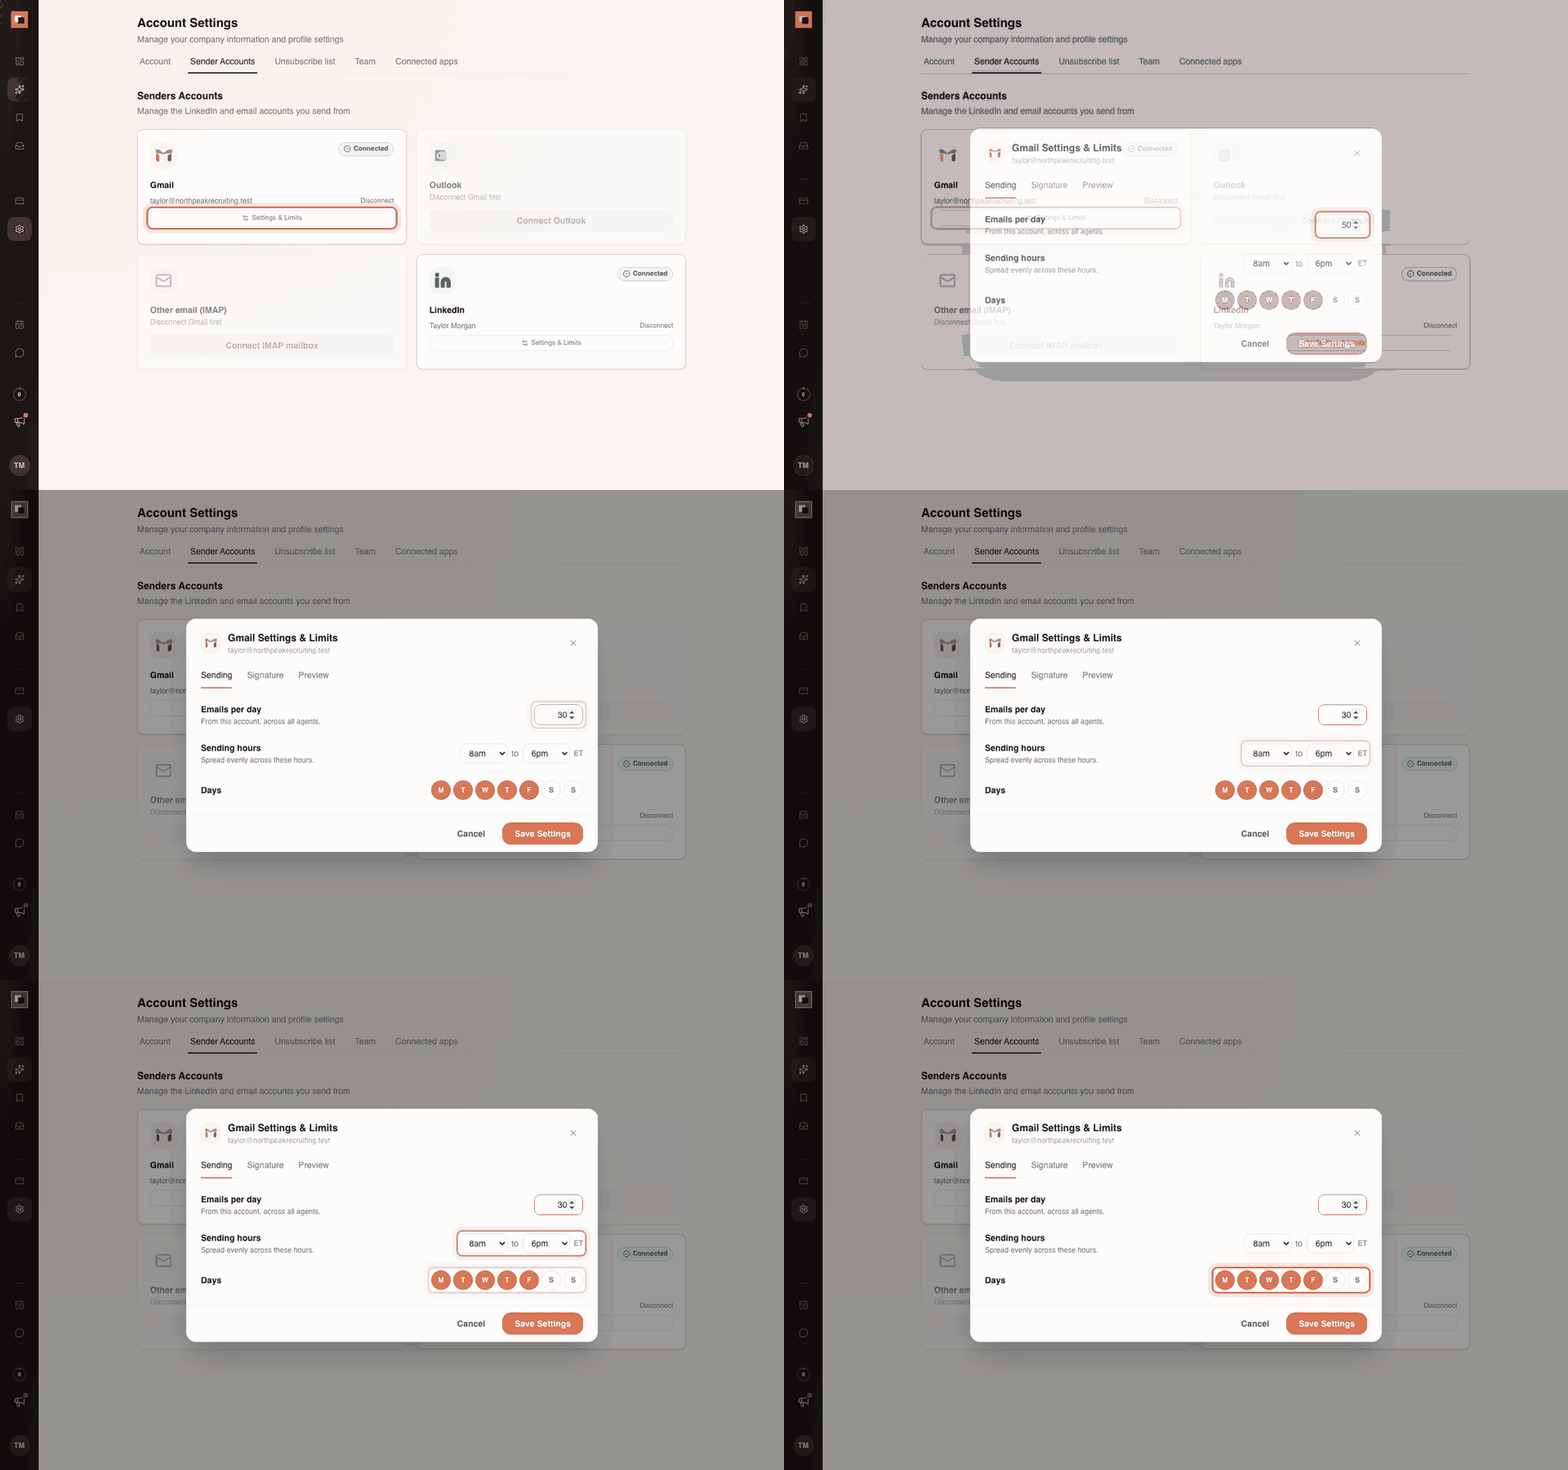
Click Save Settings when you're done. Changes apply to the next emails sent.
Step 3: Your email signature
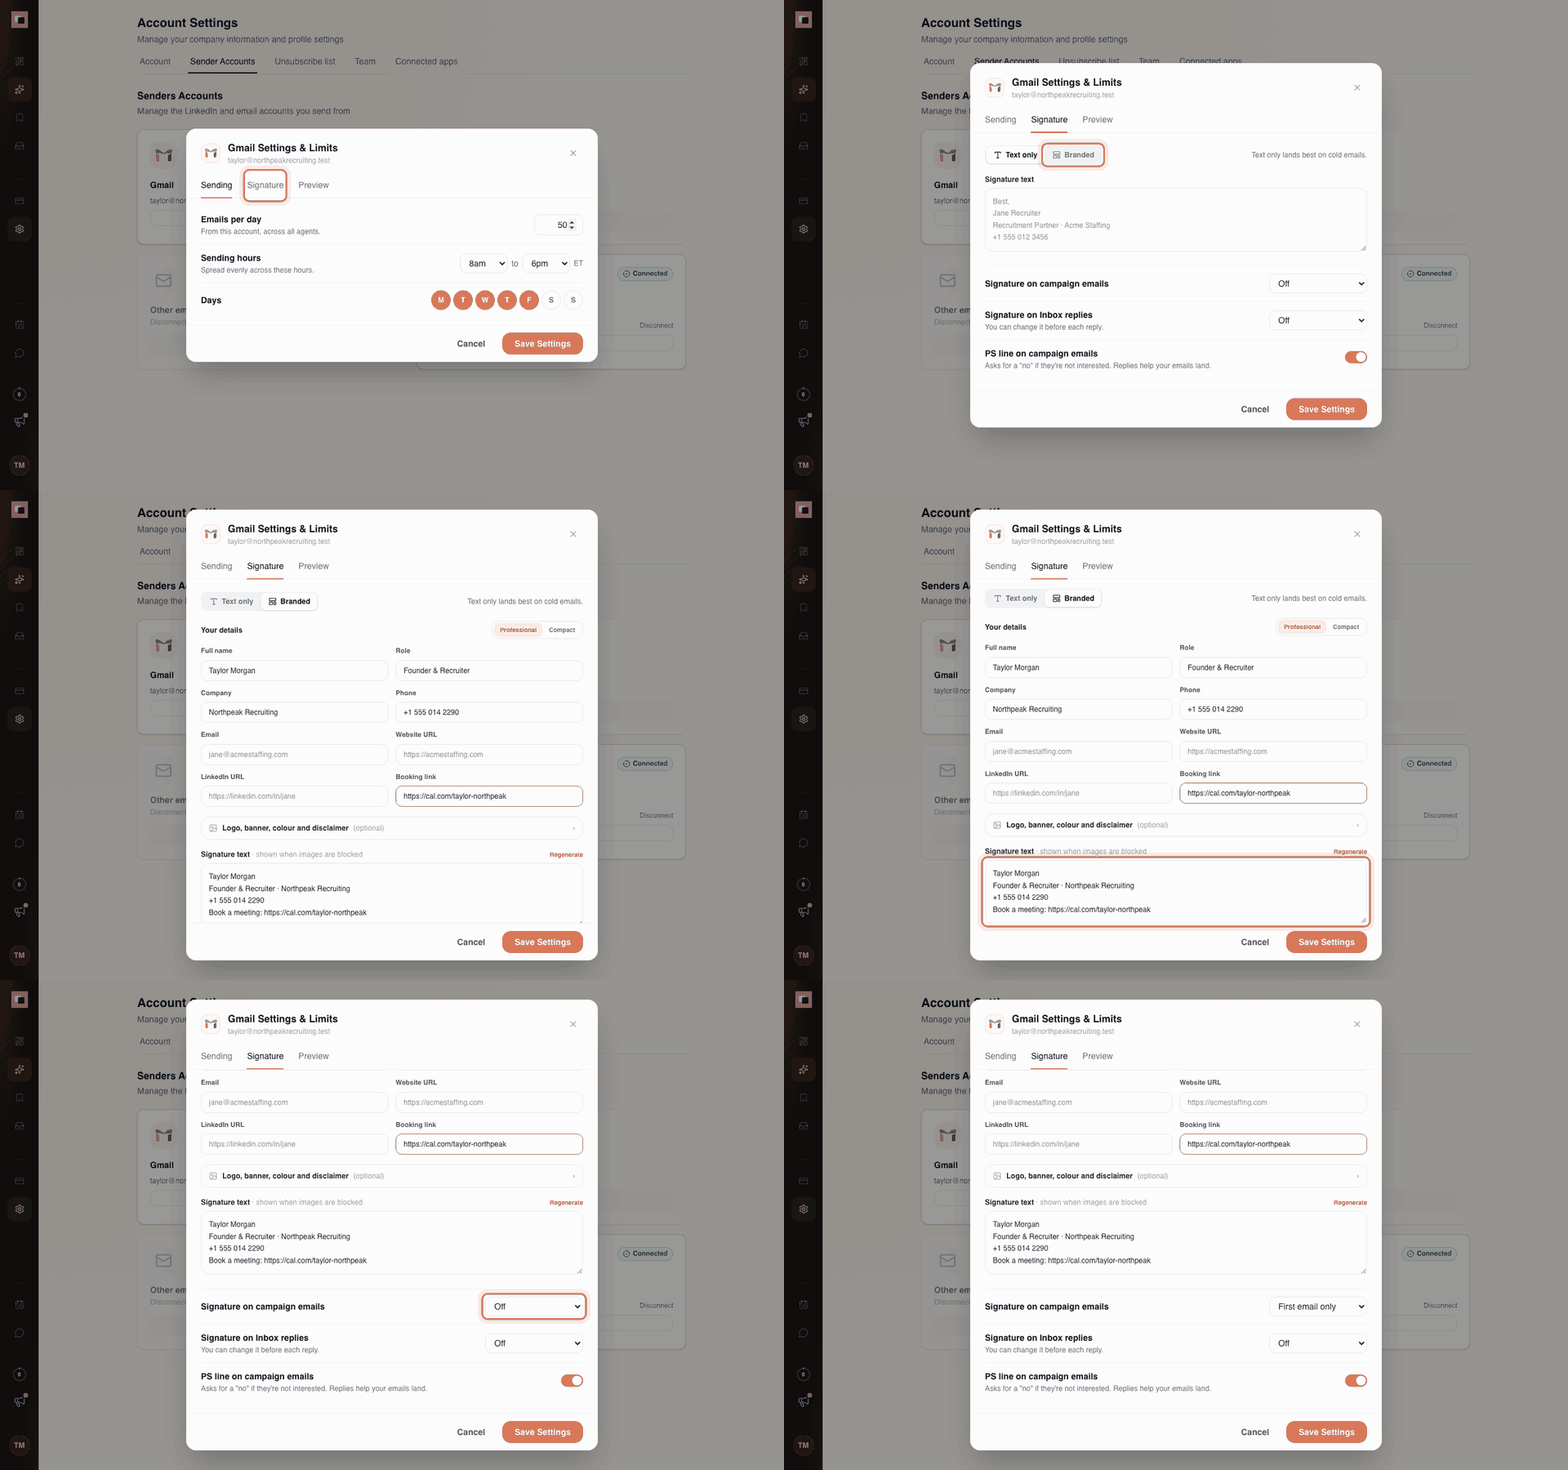
Open the Signature tab and choose a style:
Text only. A plain-text signature, like one you'd type at the bottom of an email. As the app notes, text only lands best on cold emails.
Taylor Morgan
Founder & Recruiter · Northpeak Recruiting
+1 555 014 2290
Branded. A formatted signature built from Your details:
- Full name, Role, Company, Phone, Email
- Website URL, LinkedIn URL, Booking link (for example your Calendly or Cal.com page)
- A Professional or Compact layout
- Under Logo, banner, colour and disclaimer (optional): a logo and banner from public image links (
https://…), a brand colour, a banner click-through link, and a legal disclaimer
Whichever style you choose, the Signature text box holds the plain version (up to 2,000 characters). In Branded mode it's written for you from your details and shown when images are blocked, so your contact details always arrive. Click Regenerate to rebuild it after changing your details.
Where your signature appears
Two settings decide when the signature is added. Both are off by default.
Signature on campaign emails (the emails your agents send):
- Off: no signature on campaign emails.
- First email only: the signature goes on the first email step only, so follow-ups stay short. This is the first email step, even if the sequence starts with a LinkedIn step.
- Every email: the signature goes on every email step.
Signature on Inbox replies (when you reply to a prospect from your StaffingLeads Inbox):
- Off, Short text or Full signature. This is only a default: you can change it before each reply.
Don't repeat your signature in the campaign text
Once your signature is switched on, your campaign emails don't need your full name, title, company, phone number or links at the bottom. StaffingLeads adds the signature for you. If you type them into the email step as well, the prospect sees them twice.
How each email ends depends on the type of email step:
- AI-powered email steps: the AI ends every email with the step's sign-off and your first name, for example "Thanks, Taylor". You don't type anything; you just choose the sign-off (see Step 5).
- Regular email steps (ones you write yourself): end the text with a short sign-off and your first name only:
Worth a quick call on Thursday?
Best,
Taylor
With the signature set to First email only, here's what the prospect gets:
- Email 1: your sign-off and first name, then the PS line (if on), then your full signature (name, title, company, phone).
- Follow-up emails: your sign-off, first name and the PS line only. That's normal: short follow-ups read like a real person replying in a thread.
If your signature is Off for campaign emails, nothing is added after the PS. On a regular step, end with whatever you want them to see (for example your name and company on one line).
Use Send me a test (below) to check the ending looks right before your agent starts sending.
Our advice: for cold campaigns, a text-only signature on the first email only is the safest choice. Logos, banners and lots of links make a first email look like marketing, which can hurt how often it reaches the inbox. Save the branded signature for replies and warm conversations.
Step 4: The PS line
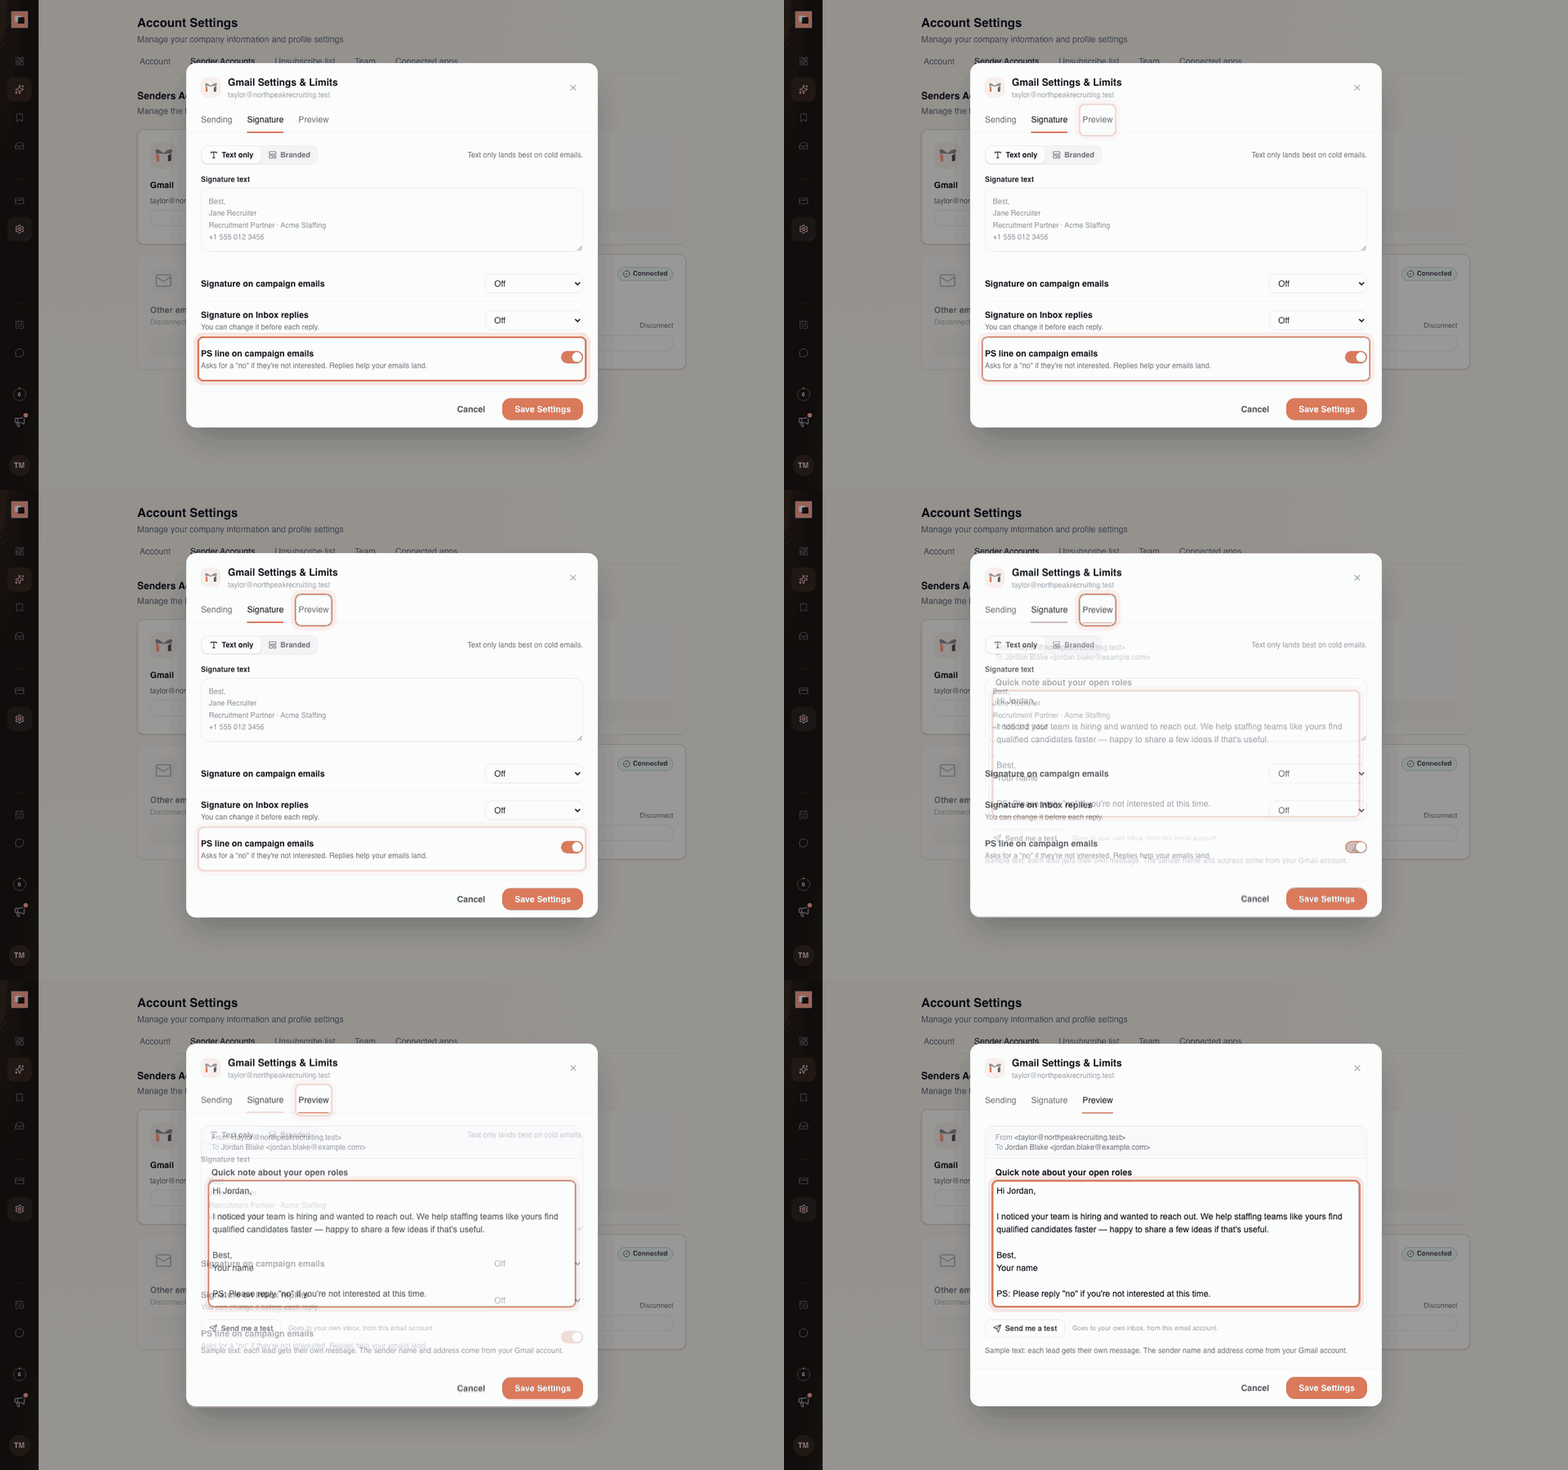
At the bottom of the Signature tab is PS line on campaign emails. It's on by default.
When it's on, each campaign email ends with a short, polite PS inviting the prospect to say no, for example:
PS: Please reply "no" if you're not interested at this time.
StaffingLeads rotates between several wordings, so a prospect gets a different PS on each step. Other versions include:
PS: If now isn't the right time, just reply "no" and I won't follow up.
PS: A one-word "no" works if you'd rather I didn't follow up.
Why it's on by default:
- A reply stops the campaign for that person, so nobody who isn't interested gets chased.
- Replies help your emails reach the inbox. Email providers treat a mailbox that gets replies as a real person having conversations. Even "no" replies build that trust.
- It's courteous. Busy hiring managers appreciate an easy way out, and it protects your reputation in a small industry.
You can switch it off for this mailbox if you prefer your own closing line. It only affects campaign emails, never your own Inbox replies.
Step 5: Choose the sign-off on AI-written emails
AI-powered email steps write a different email for each lead. Every one of them ends with a sign-off line and your first name on the next line:
Would a short call on Thursday work?
Best,
Taylor
By default every step uses Thanks, followed by your first name. To change it:
- Open your agent and go to the Campaign tab.
- Click Edit on an AI-powered Email step.
- Under Writing instructions, find Sign-off.
- Click a quick pick (Thanks, · Best, · Regards, · Cheers, · Thank you, · Best regards,) or type your own in Or type your own.
- The line underneath confirms it: Every email from this step ends with "Best," and your first name on the next line.
- Pick a lead under Preview for a lead to see a real email with your new sign-off, then click Save.
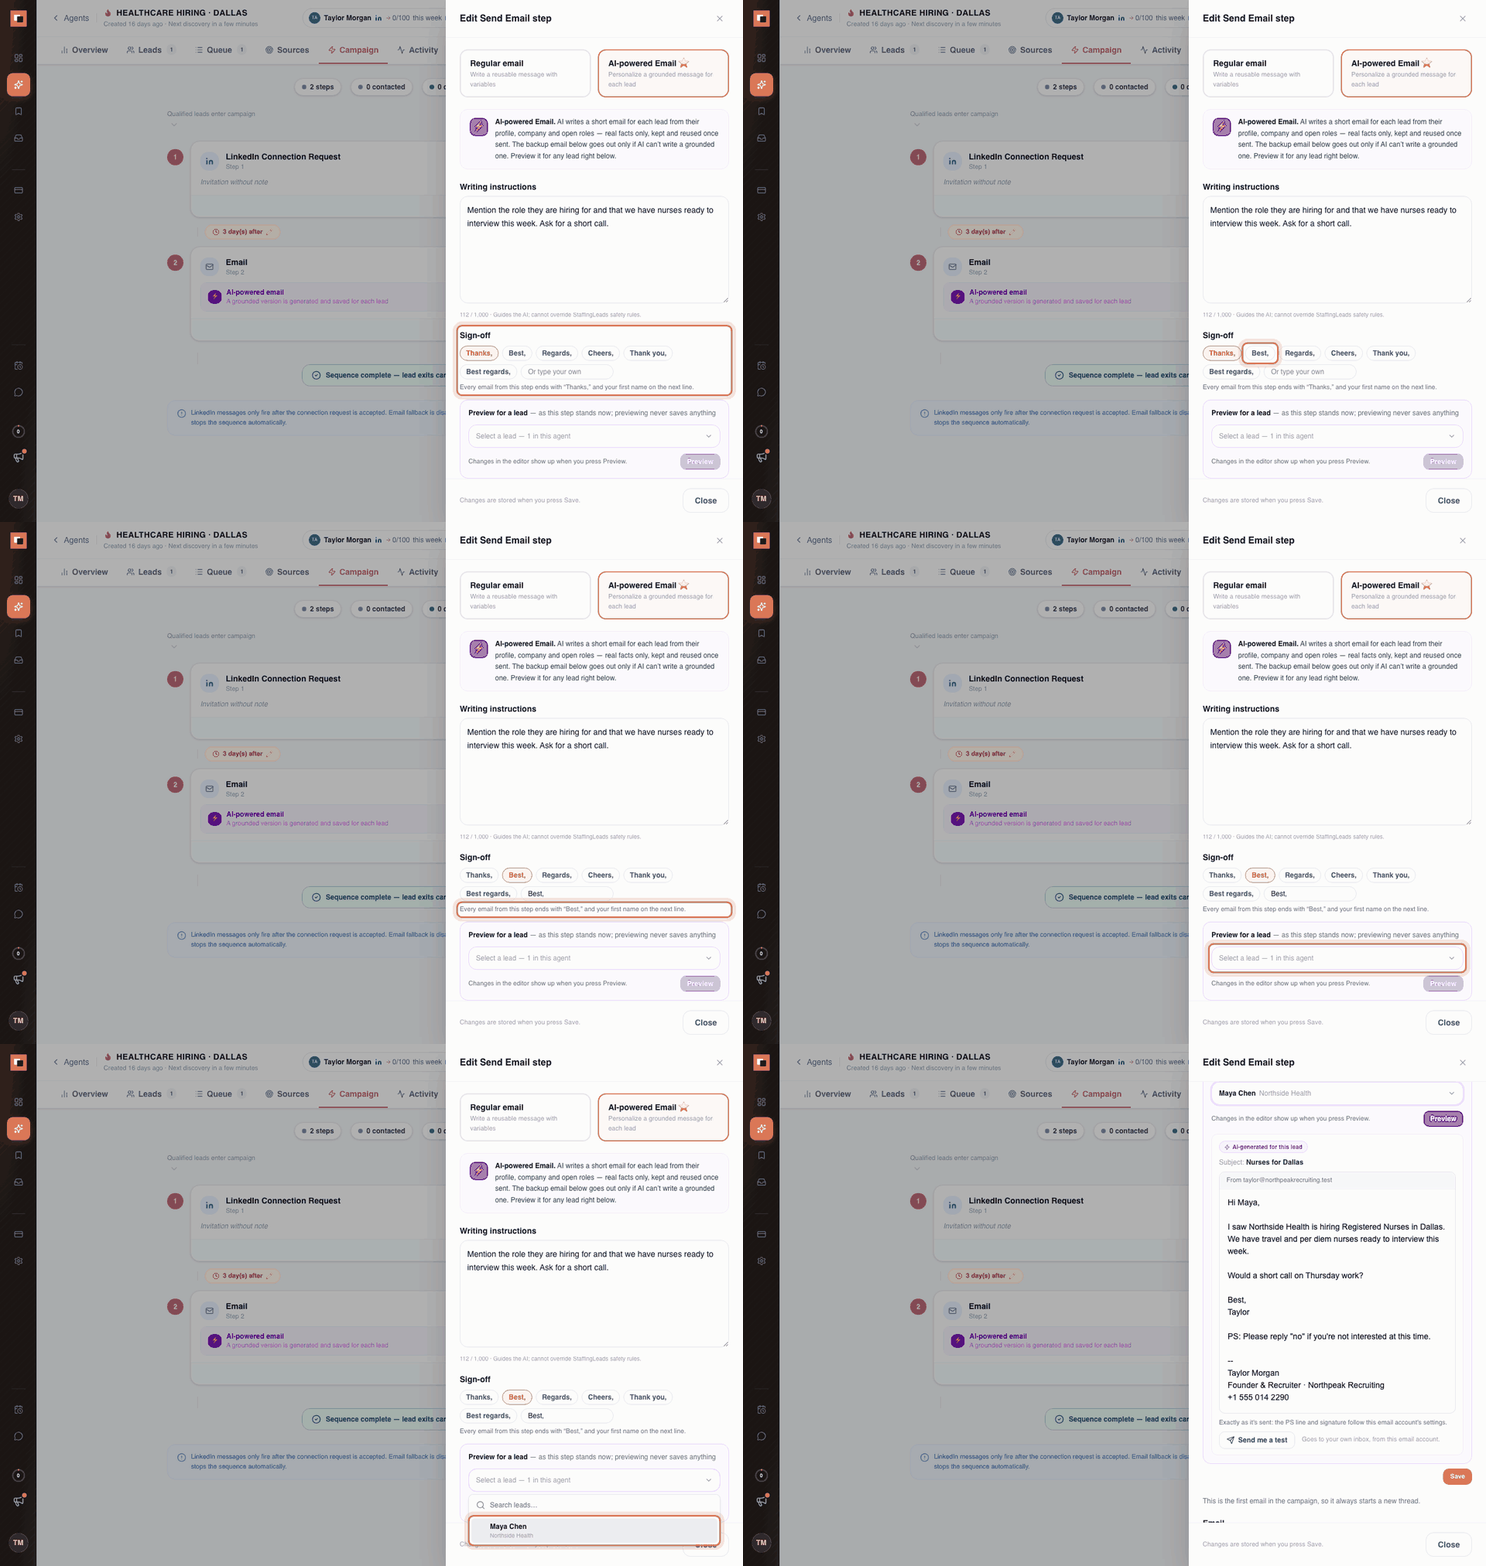
Good to know about the sign-off:
- Each step has its own. For example, "Thanks," on the first email and "Cheers," on a follow-up.
- Your own sign-off can be up to 40 characters on one line. Links, email addresses,
{{variables}}and line breaks aren't allowed (the field tells you before you save). - The first name comes from your profile: the First name under Account Settings → Account. Make sure it's the name you want prospects to see.
- Steps you never changed keep "Thanks,", so nothing changes for agents already running.
- Regular email steps aren't affected. Emails you write yourself end exactly the way you write them.
- The sign-off is separate from your signature: the sign-off is the "Thanks, Taylor" line the AI writes; the signature (if on) comes after the PS line.
Step 6: Preview it, then send yourself a test
In Settings: the Preview tab
The Preview tab shows a sample campaign email built by the same code that sends your real emails, using the settings in the window right now, even before you save. You'll see:
- From and To: your mailbox's address and a sample prospect.
- The email itself: a sample shaped like an AI-written email (subject "Quick question", two short sentences, a question, then "Thanks," and your first name), followed by the PS line and your signature, exactly as Gmail or Outlook will show them. Each real lead gets their own message, and emails you write yourself end the way you write them.
Then click Send me a test. StaffingLeads sends that email from this account to your own inbox, with [Test] in the subject. Open it in Gmail or Outlook and check it the way a prospect would see it, on desktop and on your phone.
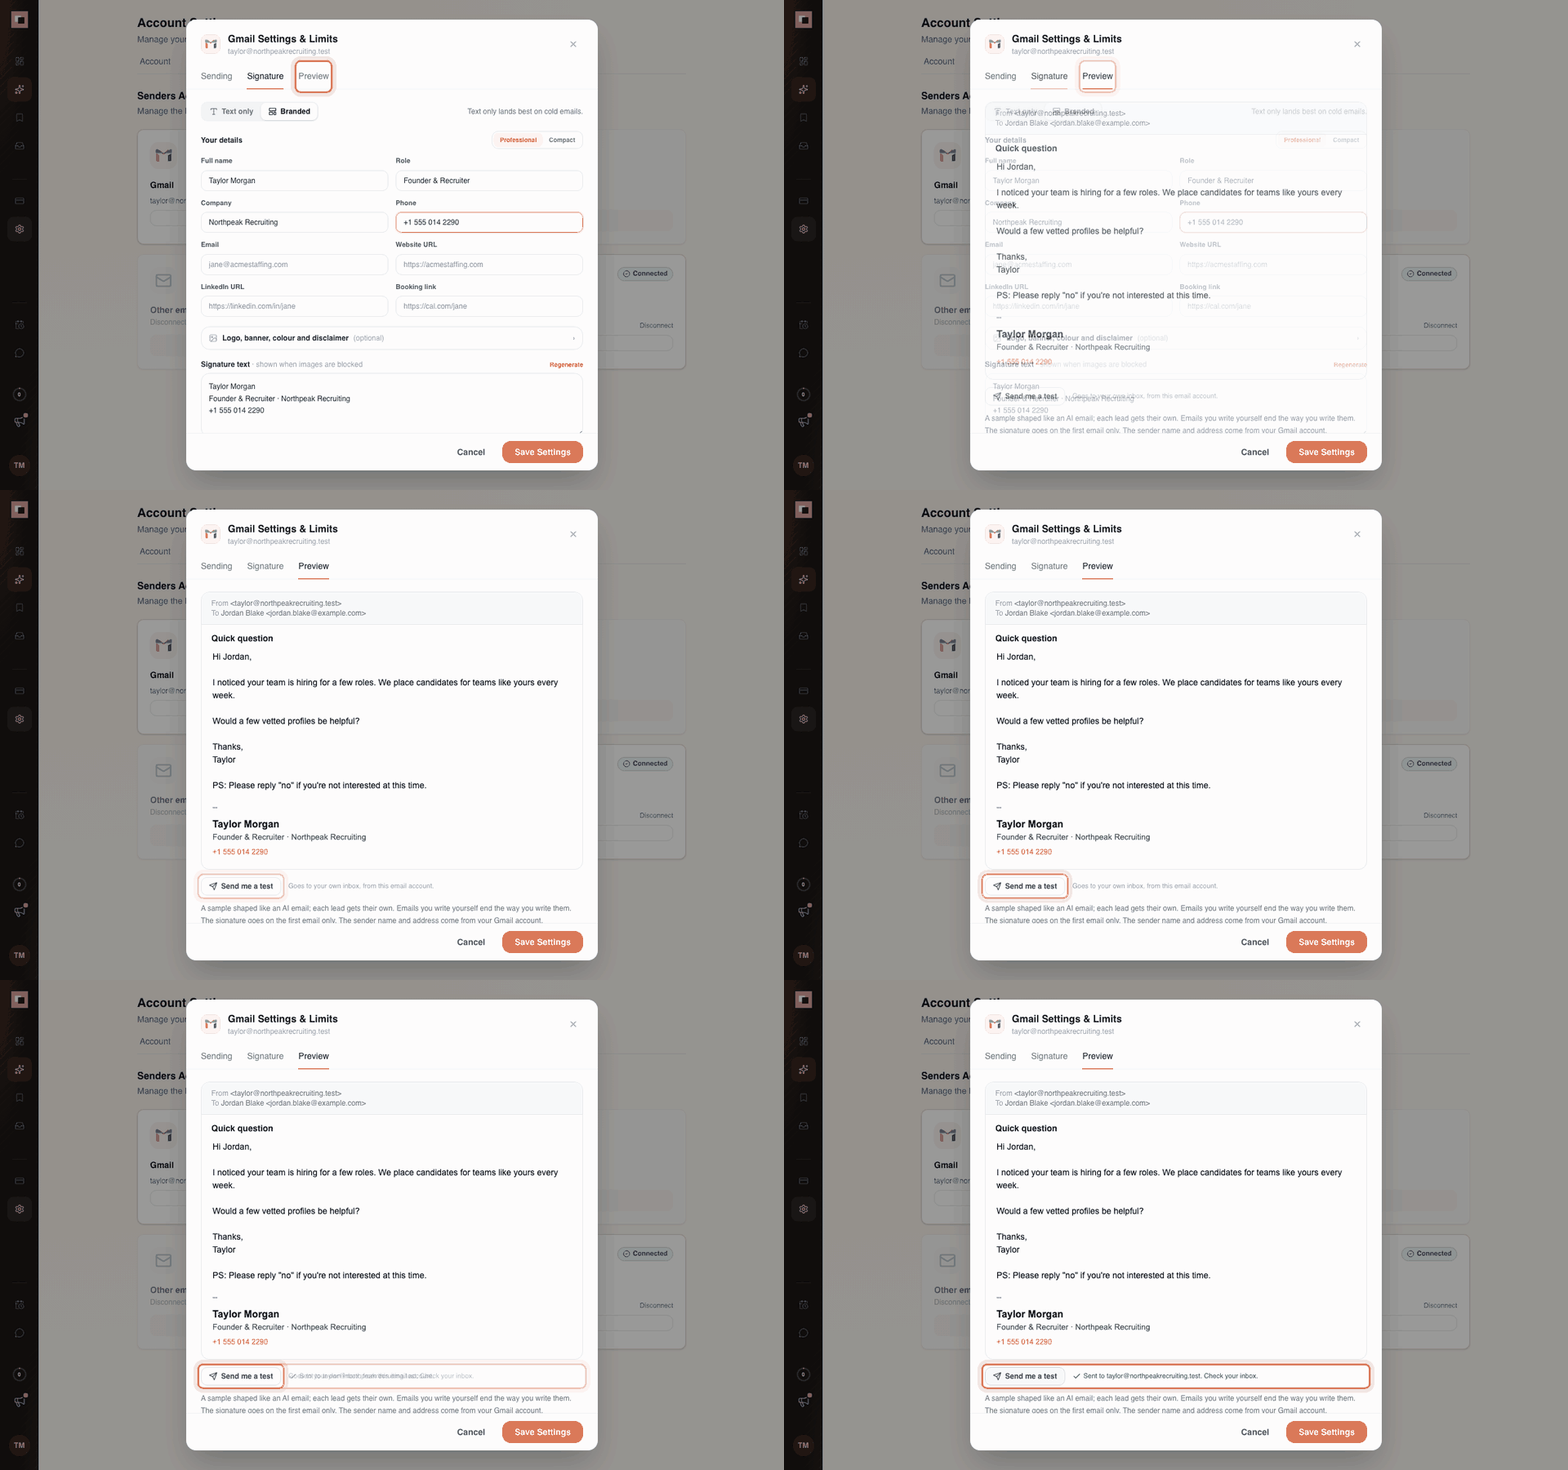
In a campaign: test a real step for a real lead
You can also test an actual email from one of your agents, filled in for a real lead:
- Open the agent and go to the Campaign tab.
- Click Edit on an email step.
- Under Preview for a lead, choose a lead from the list.
- You'll see the email exactly as it will be sent to that lead: the subject, the From address, the personalised text, the sign-off (on AI steps), the PS line and the signature from that email account's settings.
- Click Send me a test to get that exact email in your own inbox.
Previewing never saves anything and never sends anything to the lead. If you change the step's text, press Preview again to refresh it.
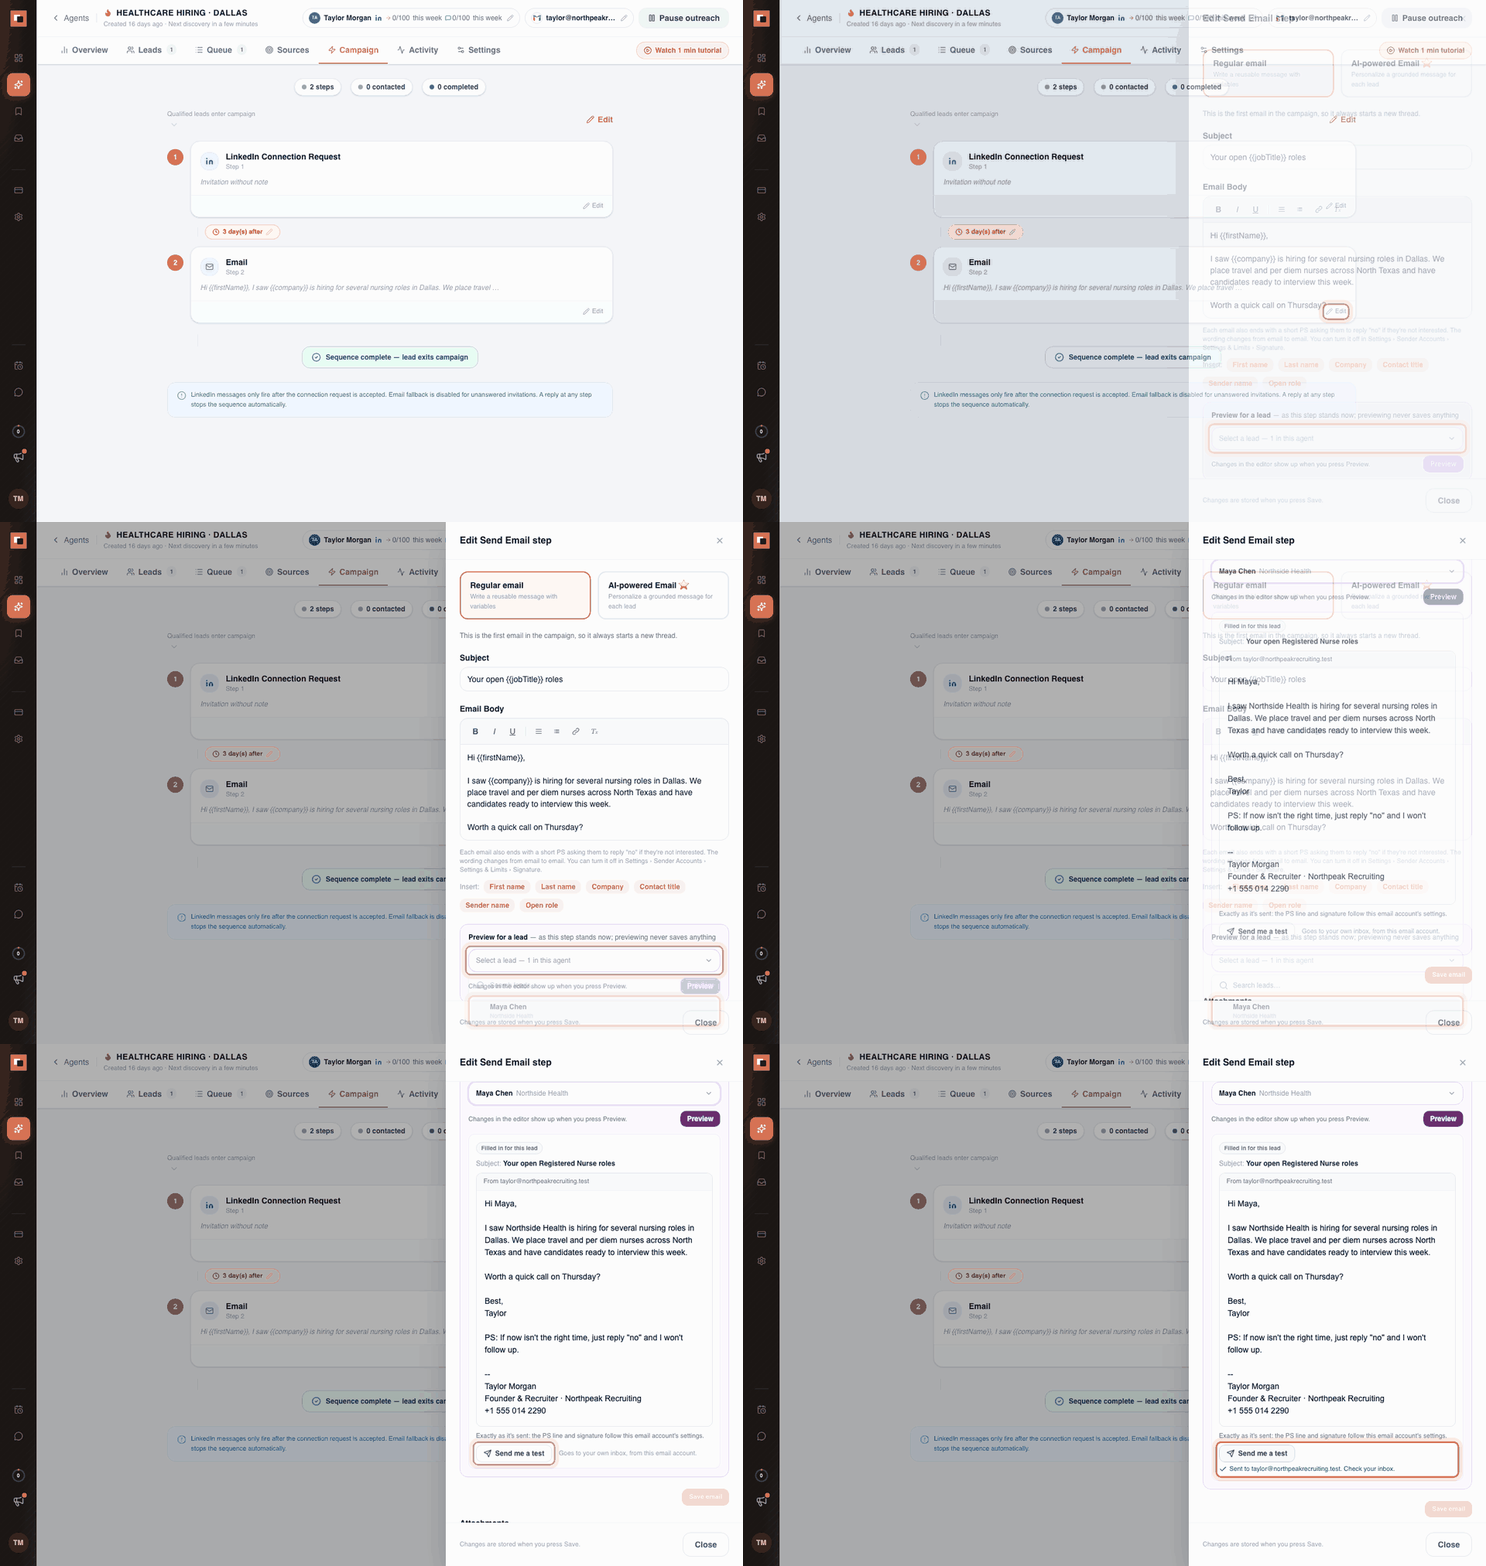
Good to know about test emails:
- A test goes only to you, from the same email account the lead would hear from.
- It doesn't count toward your Emails per day limit, and it doesn't appear in your StaffingLeads Inbox.
- You can send up to 20 tests a day.
- Emails waiting in an agent's Queue show the same rendered preview when you open them.
Your sender name comes from your mailbox, not StaffingLeads. Prospects see the name and address set in Gmail, Outlook or your email provider. If your test shows only your address, or a name you don't want, change it in your mailbox:
- Gmail: Settings → See all settings → Accounts (or Accounts and Import) → Send mail as → edit info. On Google Workspace, your admin may control this.
- Outlook / Microsoft 365: the name on your Microsoft account profile. On a company account, your IT admin may control this.
A simple routine for your first week
- Send yourself a test from the Preview tab after any change to your signature or PS line.
- Check your first name and sign-off. Your profile's first name signs every AI email, so make sure it's right, and pick a sign-off on each AI email step if you don't want "Thanks,".
- Test one real step from each agent's Campaign tab before you switch the agent on.
- Start low. Set Emails per day to around 10 for the first couple of days.
- Watch your StaffingLeads Inbox for replies and bounces.
- Raise the limit to your target (we suggest 30) once everything looks right.
Optional: check your domain setup. Free tools such as mail-tester.com let you send one email from your mailbox and get a report on whether your domain's SPF, DKIM and DMARC records are set up. These are DNS settings that prove you're allowed to send from your domain. If any are missing, ask whoever manages your domain or email to add them before you send at volume.
Who never gets emailed: your Unsubscribe list
Under Account Settings → Unsubscribe list you'll find everyone StaffingLeads will never contact again:
- People whose reply you marked Not interested are added automatically.
- You can add a person's email or LinkedIn profile, or a whole company by its domain (for example a current client you don't want prospected).
- You can upload a CSV or Excel file to add many at once.
- Removing someone allows outreach to them again from their next step. Nothing already skipped is re-sent.
FAQ
Do these settings apply to all my agents? Yes. They belong to the mailbox, so every agent sending from it uses the same limits, hours, signature and PS setting. You can also change the Sending settings from an agent's page by clicking the pencil next to its email sender.
Will StaffingLeads ever send more than my daily limit? No. Once the mailbox reaches its Emails per day limit, the rest wait for the next sending day.
Do test emails use up my daily limit? No. Tests don't count toward Emails per day. You can send up to 20 a day.
Can I write my own PS? The PS is a fixed set of short wordings that StaffingLeads rotates. If you'd rather close emails your own way, switch it off and put your closing line in your signature.
Do I still need to type my name and company at the end of each campaign email? Not if your signature is on. StaffingLeads adds it for you. AI-powered steps already end with your sign-off and first name; on regular steps, end with a short sign-off and your first name ("Best, Taylor"). Typing your full details as well would show them twice. If your signature is off, include whatever you want them to see in the step itself.
Can I change "Thanks," at the end of AI emails? Yes. Each AI-powered email step has a Sign-off field under Writing instructions. Pick Best, Regards, Cheers, Thank you or Best regards, or type your own line (up to 40 characters). Your first name always follows on the next line.
Why does my AI email sign off with the wrong name? The name after the sign-off is the First name in your profile (Account Settings → Account). Change it there and new emails use it.
Does changing my signature change emails already sent? No. Changes apply to emails sent after you save.
Why does the preview show my email address instead of my name? Your mailbox doesn't have a display name set, or StaffingLeads only has your address. Set your name in Gmail or Outlook as described above. StaffingLeads doesn't override it.
Related guides
Let your agent start the conversations.
StaffingLeads watches hiring, hard-to-fill, funding, leadership, past-client and network signals, finds the decision-maker behind each one, and sends personalised email and LinkedIn outreach in your voice. You pick up the replies.
Start your 3-day free trial →Keep reading
Free, no signup